
What to include on a trade job sheet: a practical checklist
Use this practical checklist to prepare a visit, guide the worker and give the office a clear handover when the work is ready for review.

A useful job sheet answers the questions that otherwise become phone calls: which property, who is meeting us, what was agreed and what happened during the visit? Start with those decisions when building a job sheet template. A page full of empty boxes is less useful than a short, clear record that the worker and office can both understand. If you want a blank page to start from, print the free job sheet template and use the checklist below to decide what your business actually fills in.
This guide is a practical template checklist for Australian trade and service businesses. Use it to organise a paper form or assess a job sheet app. Nenvik's job sheet software workflow brings together job records and assigned worker evidence. For the separate question of how to keep meaningful work history, read electronic job sheets: what to record.
Start with the customer and the exact visit
Put the job reference, visit date and service address where they are easy to find. Include the paying customer and the person who can answer questions on site. These may be different people. A property manager might arrange the work while a resident opens the gate; recording only the payer's office address leaves the worker without a usable destination.
- Job reference and a plain description of the visit.
- Customer name and the contact responsible for arranging the work.
- Service site, unit or building identification and the actual work location.
- Site contact, contact method and agreed attendance arrangements.
- Scheduled visit details and the worker or crew selected by the office.
In Nenvik, organise the commercial customer, people and operational locations through customers and service sites. Check the location saved on the job before dispatch. Later changes to the service site do not rewrite historical job details. That distinction matters when a customer has several buildings or a contact has recently moved.
Give access instructions their own space
An address does not explain how to get in. Your template should prompt the office to confirm parking, the entrance to use, who will meet the worker and any site conditions the team needs to review. Record uncertainties as questions to resolve before attendance. Avoid copying an old access instruction into a new visit without checking that it still applies.
Nenvik's service site form includes Access instructions, Parking instructions and Safety notes under Arrival and safety, with site contacts recorded separately. Use factual, necessary instructions. Keep credentials and unrelated personal information out of work photos and diary entries. The aim is to help the assigned team reach the work area and understand the arrangements without exposing unnecessary customer detail.
Write the scope as a working instruction
A heading such as maintenance visit is too broad on its own. Describe the areas or equipment involved, the agreed tasks, the exclusions and anything that must be checked before work begins. Identify which quote or later approved change explains the current scope. The worker should be able to distinguish the planned work from a new request raised during attendance.
- Included tasks and the area or equipment each task concerns.
- Relevant measurements, product details or customer choices already confirmed.
- Exclusions, assumptions and information still awaiting confirmation.
- Checks needed before starting and issues to refer to the office.
- Any additional work requiring a separate customer decision.
Use short task descriptions rather than pasting an entire email conversation into the sheet. Keep the original agreement available for context. In Nenvik, staff can configure assignment checklist items and manually apply reusable custom forms. Choose prompts that fit the actual visit; a worker should not have to answer unrelated questions simply because the business uses one oversized form.
Separate materials, time and work notes
Give materials their own section with an understandable description, quantity and relevant unit. Distinguish what was used from what was planned or still needs ordering. Give time its own section too, with enough context to understand the visit. An unexplained total at the bottom of a page is difficult to review when the worker attended more than once.
The field evidence and time guide explains Nenvik's Checklist, Photos, Time, Materials and Sign & submit areas. Start Work prepares an assignment when offered; the worker starts the timer separately in Time. Close active timers and check material entries before submission. Treat those entries as evidence for review rather than assuming they have already become invoice lines.
Use photos and notes to explain the result
Your template should ask what was found, what was done and what remains outstanding. A useful photo shows the relevant area clearly and has a purpose: explaining the starting condition, progress or finished work. A useful note identifies the finding and next action. Avoid vague entries such as all good when a future worker may need to understand exactly what was checked.
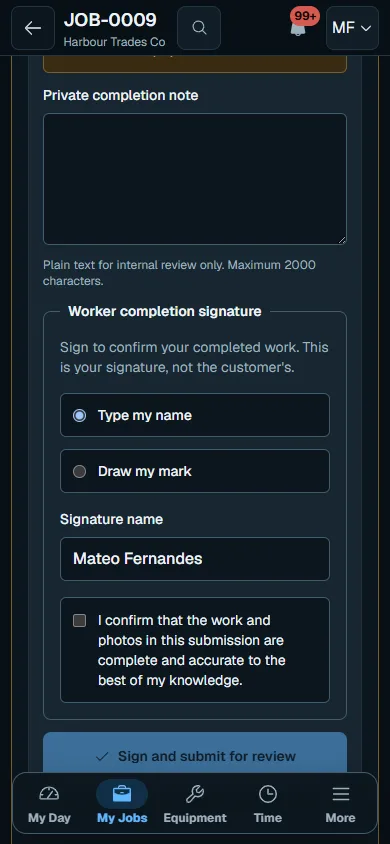
Nenvik workers open eligible assigned work through My Day and My Jobs. They can add evidence within the assignment and submit it for office review. Private work evidence stays private unless a separate authorised publication action is used. Select only necessary images and keep unrelated people, payment information and private customer material out of the record.
Include sign-off where used, then office review
Leave room for the worker's completion statement and a clear office review outcome. If your process uses customer sign-off, explain what the customer is confirming and provide a way to record unavailability. Do not make a visit sheet carry several different meanings. Confirming that site work occurred is separate from accepting a price change or confirming that an invoice has been paid.
In Nenvik, Customer sign-off is optional when enabled. The customer can provide a typed or drawn signature, or the worker records why the customer is unavailable. It confirms visit work at the site; it does not approve payment or variations. The assignment forms and submission guide explains the separate worker signature, completion note and submission steps.
Choose a format the team can maintain
Paper can suit a simple visit if someone checks that the current sheet reaches the worker and the completed copy returns to the office. Allow space for legible notes and a clear reference to separate photos. Decide who transfers changes into the business record. Otherwise, the paper sheet, a text message and the invoice can each tell a different version of the visit.
When assessing electronic job sheet software or an online job sheet, test the whole handover. Can the worker find the right assignment, read the instructions and submit the required evidence? Can the office identify missing information? Nenvik combines job records with worker submissions; its private evidence export is a ZIP for authorised staff, rather than a dedicated customer-ready combined job sheet PDF.
- Prepare one real visitCheck the customer, site, access instructions and current scope before assigning work.
- Review the worker's viewCheck that the assigned worker can find the instructions and the checklist or form needed for that visit.
- Review the returnCheck time, materials, photos, completion notes and outstanding issues before deciding the next office action.
Keep the template focused on decisions the business actually uses. Review a completed visit with someone who was not there: if they can understand the scope, result and next action, the sheet is doing its job. Add a field when it resolves a recurring gap, and remove duplicate prompts that encourage rushed, unhelpful answers.
Give the template a final handover prompt: what does the office need to do next? The answer might be review an unresolved issue, arrange another visit or prepare an invoice after checking the work. Make that action explicit so the completed sheet helps the next person continue the job without asking the worker to repeat the whole visit.
Common questions
What should a trade job sheet include?
Include the customer, service site, access arrangements, agreed scope, materials used, time, relevant photos, work notes and review outcome. Add worker and optional customer sign-off where your process uses them.
Can I use this checklist for a paper job sheet?
Yes. Arrange the fields around preparing, carrying out and reviewing the visit. Decide how the completed sheet and separate photos will return to the office.
Does customer sign-off approve extra work?
No. Nenvik's optional Customer sign-off confirms visit work at the site. It does not approve variations or payment.
Does Nenvik generate a combined customer job sheet PDF?
Nenvik brings together job records and worker evidence, with a private evidence ZIP for authorised staff. It does not provide a dedicated customer-ready combined job sheet PDF.
More from the blog
 Locksmith call-outs: dispatch, install quotes and getting paid on siteKeep urgent call-outs and planned installs in the same diary, with clear job records, agreed charges and confirmed payments.Read article
 Deposits on quotes: a practical guide for tradiesExplain a deposit before the customer accepts, check the resulting invoice and confirm payment separately from acceptance and scheduling.Read article
 Late payments and invoice reminders for tradiesMake the invoice clear, check the live balance before following up and use reminders with a deliberate delivery setup.Read article